
04 — Copilot Pages
Copilot Pages is where your research becomes a document. Think of it as a collaborative canvas — you pull content from Copilot Chat into a live page, edit it, refine it with Copilot, and share it with your team in real time.
Prompts to Try: Open the copy-paste prompt exercises for this topic.
Continuing from Topic 03
At the end of Topic 03 you ran the consolidation prompt (Part 8) which produced a structured outline of your research. That outline is your starting point here.
If you are still in the same Copilot Chat session: Click … under the consolidation response → Edit in Pages → Add to new page. This opens your outline as a live Copilot Page. You are ready to start Topic 04.
If you closed the session or started a new chat:
- Open a new Copilot Chat
- Paste your research outline into the message box
- Submit the Part 2 draft prompt from prompts.md
- Click Edit in Pages on the response
If you did not complete Topic 03: Go to prompts.md Part 2 and submit the draft prompt directly in Copilot Chat. It will generate a draft from scratch. Click Edit in Pages on the response and continue from there.
Important: Once you are in Copilot Pages, do all your refining work there. Do not start a new Copilot Chat session for each prompt — use the Copilot panel inside the Page so all your edits stay in one document.
What is Copilot Pages?
Copilot Pages is built on Microsoft Loop. When you generate content in Copilot Chat, clicking Edit in Pages creates a Loop page that:
- Stays live and editable — you and teammates can edit simultaneously
- Syncs across Microsoft 365 — share it in Teams and people can edit it right there
- Can be exported to Word or PDF when you are done
- Saves automatically to your Microsoft 365 account
Pages vs Word
| Copilot Pages | Microsoft Word | |
|---|---|---|
| Best for | Collaborative drafting and live editing | Final polished documents |
| Real-time co-editing | Yes | Yes, but less fluid |
| Copilot integration | Built-in panel | Built-in panel |
| Export options | Word, PDF, copy to clipboard | PDF and various formats |
| Feels like | A wiki or Notion page | A traditional document |
Use Pages to build and refine your draft. Use Word for the final version you will submit for approval.
Workshop Scenario
Your research from Topic 03 is now in Copilot Pages as a structured outline. Your goal in this topic is to turn that outline into a proper first draft of the AI Usage Guide, refine it section by section using Copilot, add a visual decision flowchart using Mermaid, and export it to Word ready for Topic 05.
Creating a Mermaid Diagram in Pages
Copilot Pages supports Mermaid syntax for creating flowcharts and diagrams directly inside your document. This is useful for visualising your AI decision-making workflow without needing any drawing tools.
What is Mermaid?
Mermaid is a text-based diagramming tool. You write simple instructions and it renders a visual diagram automatically. No drawing required.
How to insert a Mermaid diagram in Pages
- Place your cursor where you want the diagram
- Type
/to open the insert menu - Select Mermaid
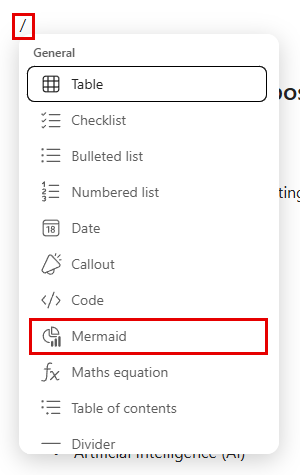
Type / on an empty line and pick Mermaid from the insert menu.
- Replace the sample code with your own diagram. The preview updates as you type.
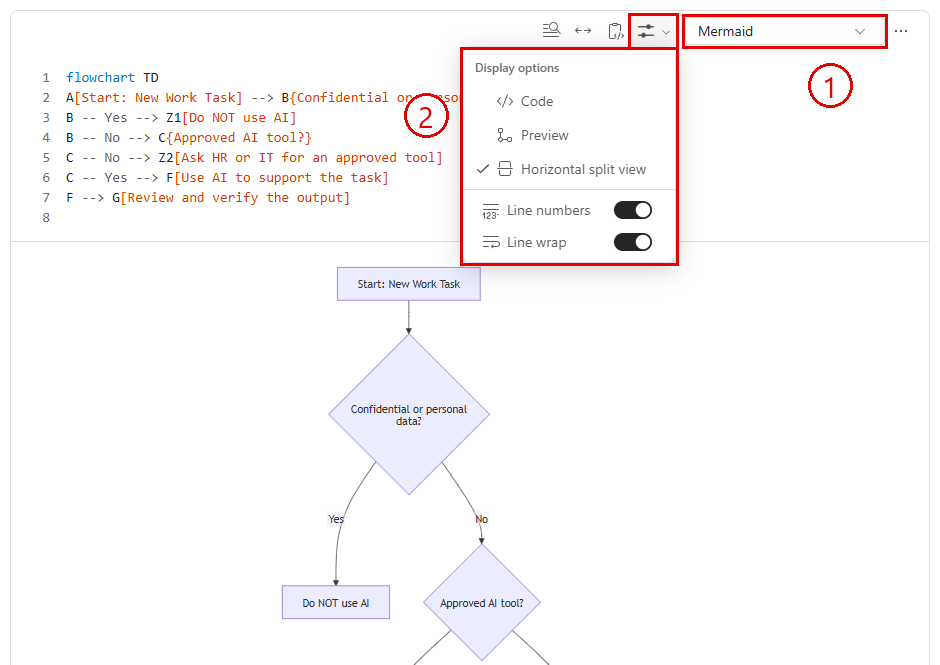
Callout 1: the language selector at the top right of the block — it must say Mermaid for the diagram to render. Callout 2: Display options, where you choose Code, Preview, or Horizontal split view (code above, diagram below).
Common mistake: When Copilot generates a Mermaid code block, it sometimes sets the language to “code” or leaves it blank. Always check the top right of the code block and change it to Mermaid if it is not already set. Otherwise the diagram will not render.
Example diagram
flowchart TD
    A[Start: New Work Task] --> B{Does the task involve confidential or personal data?}
    B -- Yes --> Z1[Do NOT use AI. Use standard processes.]
    B -- No --> C{Is the AI tool approved by the organisation?}
    C -- No --> Z2[Do NOT use AI. Ask HR or IT for an approved tool.]
    C -- Yes --> D{Is manager approval required for this use?}
    D -- Yes --> D1[Get manager approval first]
    D1 --> E{Is the task suitable for AI?}
    D -- No --> E
    E -- No --> Z3[Do NOT use AI. Complete the task manually.]
    E -- Yes --> F[Use AI to support the task]
    F --> G[Review and verify the output before using it]
Exporting from Pages
When your draft is ready to move to Word:
- Click the … menu at the top right of your Page
- Select Export
- Choose Document (Word) — or PDF if you only need a read-only copy
You will use this Word document in Topic 05 to reformat it as a formal management proposal.